
Introduction
They designed the Avalanche platform as an open-source platform for Decentralized Applications (DApps), focusing on improving scalability, interoperability, and usability across its three chains. To engage with the Avalanche ecosystem and its DApps, possessing an Avalanche Wallet is essential.
Avalanche Wallet: Accessing The DApp Ecosystem
Avalanche Wallet is a web wallet for cryptocurrencies that operates on the Avalanche blockchain, providing access to the Avalanche decentralized application (DApp) ecosystem.
Multi-chain support: The wallet has three types of addresses, including X-Chain, C-Chain, and P-Chain, each serving a specific purpose for storing cryptocurrencies. The X-Chain mainly stores assets, the C-Chain enables interaction with smart contracts, and users utilize the P-Chain for staking. The Avalanche Wallet also allows for cross-chain transfers of tokens between the three chains.
It is important to ensure the destination wallet is compatible with the chain used when moving assets out of the Avalanche Wallet. For instance, MetaMask and Binance wallets are incompatible with any other than the C-Chain wallet. Therefore, one can use the cross-chain function to transfer Avalanche tokens to the C-Chain wallet.
They designed the Avalanche platform as an open-source platform for Decentralized Applications (DApps), focusing on improving scalability, interoperability, and usability across its three chains. To engage with the Avalanche ecosystem and its DApps, possessing an Avalanche Wallet is essential.
How Avalanche Wallet Operates: An Overview
Avalanche Wallet: An Introduction
Avalanche Wallet is a non-custodial browser wallet that allows users to interact with the Avalanche ecosystem. The wallet enables users to store, transfer, and stake various cryptocurrencies and even create NFTs. Additionally, users can swap DeFi tokens from Binance Smart Chain, Ethereum, Polygon, and other chains to Avalanche through bridge services like MultiChain.
Understanding The Three Types Of Blockchains In Avalanche
There are three types of blockchains on the Avalanche network: Exchange Chain (X-Chain), Contract Chain (C-Chain), and Platform Chain (P-Chain). X-Chain is a decentralized platform that allows you to create and trade AVAX, the Avalanche native currency, and other cryptocurrencies. Users may utilize C-Chain to develop smart contracts and access DApps and DeFi services. The P-Chain manages network validators and enables Avalanche Wallet staking.
Using The Different Chains For Different Purposes
Users can hold cryptocurrency on any of the three chains, each serving a particular function. For example, AVAX can be stored and traded on X-Chain, used to pay for transaction fees and interact with smart contracts on C-Chain, or staked on P-Chain to earn rewards. The Avalanche Wallet’s cross-chain function makes moving tokens from one chain to another easy.
Understanding Wallet Addresses And Formats
It’s essential to note that each chain has its wallet address and format. X-Chain addresses start with “X,” P-Chain addresses begin with “P,” and C-Chain addresses start with “0,” similar to Ethereum or Binance Smart Chain addresses. Users should always select the corresponding chain address when transferring tokens to and from their Avalanche Wallet to prevent loss of funds. Users must double-check the addresses before transactions since Binance and MetaMask wallets are only compatible with C-Chain.
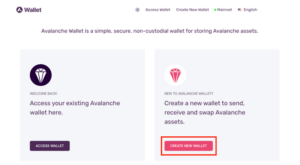
Creating An Avalanche Wallet: A Step-by-Step Guide
1-To create a new wallet on Avalanche, visit the official website and locate the “Create New Wallet” button. Be cautious of fraudulent websites made by scammers and verify that you are on the correct URL before proceeding.
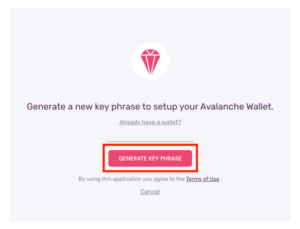
2-Press the button [Generate Key Phrase] to unveil the key phrase.
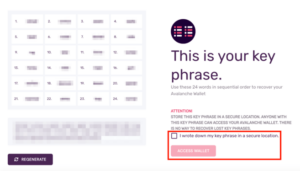
3-On the screen, you’ll find 24 words that constitute your wallet’s key phrase or seed phrase. Keeping this phrase safe is crucial because if you lose it, you’ll lose access to your wallet permanently. Unfortunately, there’s no way to retrieve a lost key phrase.
To proceed, write down the 24 words in the correct order, tick the box, and click [Access Wallet]. Remember to keep your key phrase in multiple secure offline locations and refrain from sharing it with anyone.
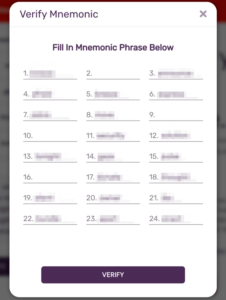
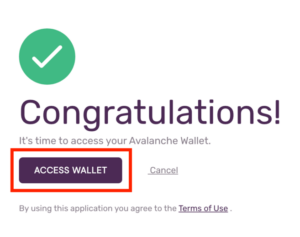
4-To ensure you have correctly backed up the key phrase, the system will prompt you to repeat specific words. You should enter the omitted words from your seed phrase and select the [Verify] option.
5-Your Avalanche Wallet has been prepared for use. To access it, please click the [Access Wallet] button to take you directly to your wallet.
Guide To Transferring AVAX From Binance To Avalanche
To engage with DeFi DApps on the Avalanche network, you must first have AVAX tokens in your Avalanche Wallet to cover transaction costs. AVAX can be obtained from exchanges like Binance and transferred to your Avalanche Wallet.
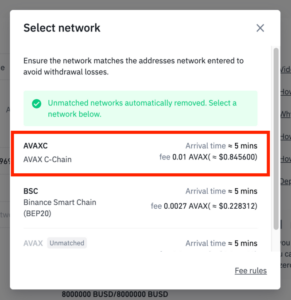
Here’s how to transfer AVAX from Binance to Avalanche. It’s important to note that only the C-Chain is compatible with the Binance exchange, meaning you can only use the C-Chain to transfer AVAX from Binance to your Avalanche Wallet. It’s important to exercise caution during the process, as selecting the wrong chain could result in losing your tokens.
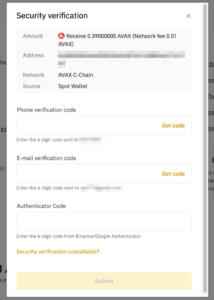
1-Access your Binance account, navigate the [Wallet Overview] section, and select [Withdraw].
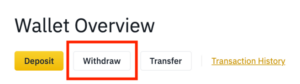
2-Choose [AVAX] from the list of tokens.
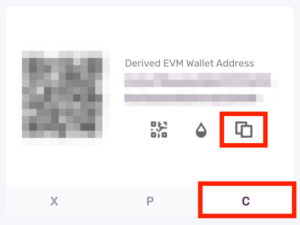
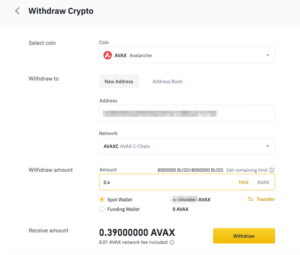
3-Access your Avalanche Wallet and locate your C-Chain wallet address by clicking on [C], then copy the Address.
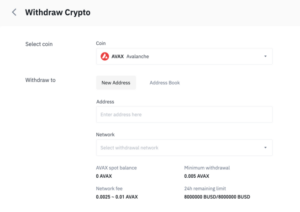
4-Head back to Binance and insert the Address in the [Address] field. After that, choose the Avalanche C-Chain network [AVAXC] by clicking on [Network].
5-Please input the transfer amount and select [Withdraw] to proceed.
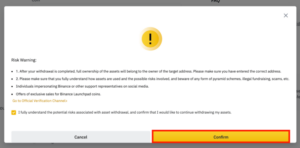
6-Make sure to carefully review the risk warning before selecting [Confirm].
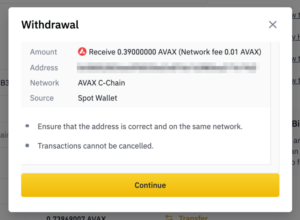
7-Please verify the information related to your withdrawal request.
8-Please confirm your 2-factor authentication for withdrawal and then select the [Submit] button. This will initiate the transfer of your AVAX to your Avalanche C-Chain wallet.
Token Transfer Guide: Moving Between Avalanche’s X-Chain, C-Chain, & P-Chain
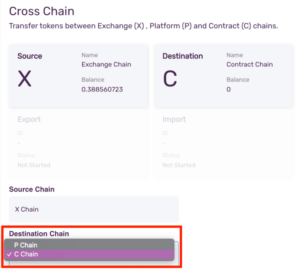
You must utilize the cross-chain transfer feature to transfer your funds between different chains. For instance, if you want to send AVAX tokens to your MetaMask wallet, you’ll have first to transfer them to your C-Chain wallet since MetaMask is only compatible with the C-Chain. Selecting the incorrect chain can permanently lose your tokens, which cannot be retrieved. In this scenario, we’ll use the cross-chain functionality to transfer AVAX from the X-Chain to the C-Chain.
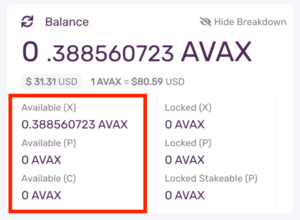
1-Access your Avalanche Wallet and verify the balance of your wallet located at the top. The X-Chain wallet contains our AVAX tokens for this instance specifically.
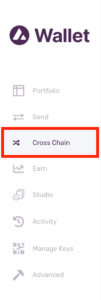
2-Select the option labeled [Cross Chain] on the left-hand menu bar.
3-Choose [C Chain] as the receiving chain and input the desired amount for transfer. Press [Confirm] to proceed, considering that a minor transaction fee will be incurred for every asset transfer between the chains.
4-They have successfully transferred your AVAX tokens to your C-Chain wallet, and you are now able to proceed with transferring them to a MetaMask or any other compatible wallet.
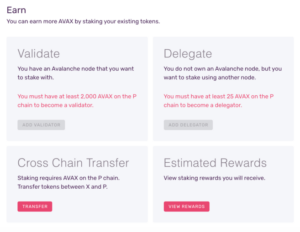
AVAX staking: Understanding The difference between validators & delegators
You can stake AVAX and obtain additional AVAX tokens by utilizing your Avalanche Wallet. You can accomplish this by becoming a validator or a delegator.
Validators are nodes that actively validate transactions and maintain the blockchain’s security. If you stake a larger amount of AVAX tokens, your likelihood of being chosen as a block validator increases proportionately.
Delegators do not perform transaction processing but rather provide support to validators. When validators receive their rewards, delegators are eligible to receive a share of the rewards based on the amount of AVAX tokens they have staked.
As of January 2022, the staking requirements stand as follows:
To become a validator, you must have advanced technical skills and run an Avalanche node on your computer with specialized software. This tutorial doesn’t delve into the technical aspects, so kindly consult the official Avalanche documentation for further guidance.
Step-by-Step Guide: Staking AVAX As A Delegator With Avalanche Wallet
Before starting, transferring the designated staking quantity of AVAX tokens to the P-Chain wallet is necessary.
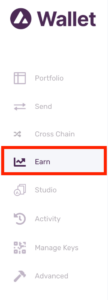
1-Access your Avalanche Wallet and select the option [Earn] on the left-hand menu.
2-Select the option labeled ‘Add Delegator’ and click on it.
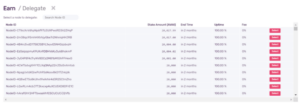
3-After selecting [Select], a list of active validators will be displayed, and you can choose which one to delegate your AVAX tokens to.
4-Choose your preferred staking duration and input the quantity of AVAX tokens you wish to stake. Please remember that you cannot designate a delegation duration that extends beyond the end date specified by the validator.
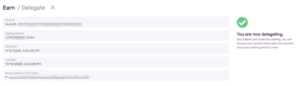
Verify that your reward address matches your P-Chain wallet address. Once you have confirmed this, click on the “Confirm” button.

5-Once you view the delegation details, you will begin to receive rewards in AV
Final Thoughts
With the Avalanche Wallet, you can conveniently access an expanding range of DeFi DApps available on the Avalanche ecosystem. The wallet interface lets you switch between the three Avalanche chains designed for distinct purposes and use cases. For further information on the Avalanche blockchain, see the article “What Is Avalanche (AVAX)?”
Rida Fatima
News writerRELATED STORIES
MORE ON NEWS
How to Stake Cryptocurrency: A Beginner’s Guide
Introduction Staking cryptocurrency is an increasingly popular method for earning passive income in the crypto space. This guide will walk you through the essentials of staking, helping you understand how it works, its benefits, and how to get started. What is Staking? Staking involves participating in a proof-of-stake (PoS) network by locking up a certain […]

Internet Computer (ICP): Decentralizing the Web
What is the Internet Computer (ICP)? The Internet Computer (ICP) comprises a set of protocols that enable independent data centres worldwide to unite and offer a decentralized alternative to the current centralized Internet cloud providers. The ICP token facilitates governance, rewards network participants for positive behaviour, and pays transaction fees. More Than Digital Money Like […]
What is cryptocurrency Stacks (STX) : A Beginner’s Guide
Introduction Stacks (STX) is a pioneering blockchain project that extends Bitcoin’s capabilities beyond simply being a digital currency into a foundation for decentralized apps (DApps) and smart contracts, all while leveraging Bitcoin’s unmatched security. Thanks to the Stacks blockchain, this transformative technology creates a unique ecosystem where Bitcoin is a store of value and a […]
TRENDING NOW
TOPICS


RELATED STORIES
MORE ON NEWS
How to Stake Cryptocurrency: A Beginner’s Guide
Introduction Staking cryptocurrency is an increasingly popular method for earning passive income in the crypto space. This guide will walk you through the essentials of staking, helping you understand how it works, its benefits, and how to get started. What is Staking? Staking involves participating in a proof-of-stake (PoS) network by locking up a certain […]
Internet Computer (ICP): Decentralizing the Web
What is the Internet Computer (ICP)? The Internet Computer (ICP) comprises a set of protocols that enable independent data centres worldwide to unite and offer a decentralized alternative to the current centralized Internet cloud providers. The ICP token facilitates governance, rewards network participants for positive behaviour, and pays transaction fees. More Than Digital Money Like […]
What is cryptocurrency Stacks (STX) : A Beginner’s Guide
Introduction Stacks (STX) is a pioneering blockchain project that extends Bitcoin’s capabilities beyond simply being a digital currency into a foundation for decentralized apps (DApps) and smart contracts, all while leveraging Bitcoin’s unmatched security. Thanks to the Stacks blockchain, this transformative technology creates a unique ecosystem where Bitcoin is a store of value and a […]